Ingredients
Cake
2 1/2 cups sifted cake flour
1/2 tsp salt
2 tbsp cocoa powder
1/2 cup unsalted butter, at room temperature
1 1/2 cups white sugar
2 large eggs
1 tsp vanilla extract
1 cup buttermilk (or 1 cup milk with 1 tsp vinegar)
2 tbsp red food colouring
1 tsp white vinegar
1 tsp baking soda
Cream Cheese Icing
1 pound cream cheese, softened (2 8oz packages)
2 sticks (1 cup) unsalted butter, softened
1 tsp vanilla extract
4 cups sifted icing sugar (sifting eliminates lumps)
Marshmallow Fondant
1 package (16 oz or 545 g) white mini marshmallows
2-5 tbsp water
8 cups icing sugar, sifted
1/2 cup solid vegetable shortening
Directions
Cake
Preheat oven to 350 F and place rack in centre of oven. Butter 2 8 inch square pans and line them with parchment paper. Set aside.
In a mixing bowl, sift together flour, salt and cocoa powder. Set aside.
In large bowl or bowl of mixer beat butter until soft (1-2 minutes). Add sugar and beat until light and fluffy (about 2-3 minutes). Add eggs, one at a time, beating well in between. Add vanilla extract and beat until combined.
In a measuring cup, whisk buttermilk with food colouring. With mixer on low speed, alternately add flour mixture and buttermilk to butter mixture, beginning and ending with flour.
In a small bowl combine vinegar and baking soda. Allow mixture to fizz and quickly fold into cake batter.
Working quickly, divide the batter evenly between the two prepared pans, taking time to evenly distribute the batter with the back of a spoon or spatula.
Bake in oven for 25-30 minutes, or until a toothpick inserted in the centre of the cake comes out clean. Cool cakes in pans for at least 10 minutes.
Once cakes have completely cooled, wrap them in plastic wrap and place in refrigerator for at least an hour (or overnight) to make frosting the cakes easier and less likely to crumble.
Cream Cheese Icing
In a large mixing bowl, beat the cream cheese, butter and vanilla together until smooth. Add sugar and on low speed, beat until completely combined.
Increase speed to high and mix until lighter and fluffy.
Marshmallow Fondant
Place marshmallows and 2 tbsp water in a microwave safe bowl. Microwave 30 seconds on high then stir until mixed well. Continue microwaving in 30 second intervals, stirring after each until melted (about 2 1/2 minutes total).
Place 6 cups of icing sugar on top of the melted marshmallow mixture. Fold sugar into marshmallow mixture. Place shortening close by so you can reapply to hands while working with the fondant. Grease hands and counter GENEROUSLY. Turn out marshmallow mixture onto counter. Knead it like dough. Continue adding icing sugar a bit at a time (re-greasing counter and hands as needed so the fondant doesn't stick). If the fondant is tearing easily, it's too dry; add water (about 1/2 tbsp at a time) kneading until it's a firm elastic ball that will stretch without tearing. This takes about 8 minutes.
With the fondant in a ball, cover with a thin layer of shortening, wrap in plastic wrap and place in a resealable bag. Squeeze out the excess air in the bag. It should be refrigerated over night, but will keep in the fridge for several weeks.
When ready to use, knead fondant until smooth. Roll out to 1/8 inch thick.
Assembling the Cake
I made the cake first. While it was cooling, I made the fondant, then the cream cheese icing. Put the cakes and fondant in the fridge, leaving the cream cheese icing at room temperature. After one hour, remove cakes from the fridge and slice both in half horizontally. Place the top of one of the cakes face down on your serving platter. Spread a layer of cream cheese icing on the bottom layer then add a layer and continue until you have all four layers down.
I would suggest putting the cake in the fridge at this point for about an hour so the cake is solid when you continue to the next step (it will help you avoid crumbs mixing with the icing). Next, spread a thin layer of cream cheese icing over the entire cake. I used the dull side of a butter knife to scrape icing, making smooth sides and top. Put back in the fridge over night.
The next day, take fondant out of fridge and either leave out for an hour or two OR (I just learned this) microwave it for a short time then check on it and continue until it's easy to work with, but not sticky. If it gets too sticky, allow to cool and then add some icing sugar; conversely, if it gets too dry and starts to crack, you can add a sprinkle of water or some shortening.
Knead the fondant until it is flexible enough to roll with a rolling pin. Roll until it is about 1/8 inch thick, and at least 16 inches x 16 inches (square). When finished, roll fondant with the rolling pin and use it to lift the fondant over the top of the cake and gently place on top.
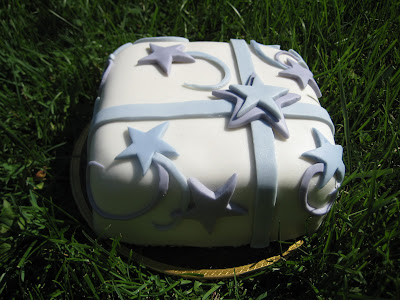
Quickly work to smooth the fondant around the cake, stretching gently down around the sides and smoothing as you go. With a sharp knife, trim excess fondant from the sides. (I bought a fondant smoother and find it works really well.) Use fondant smoother to make the surface completely smooth, then carefully trim the fondant to fit the cake perfectly. (See below)

Decorating the Cake
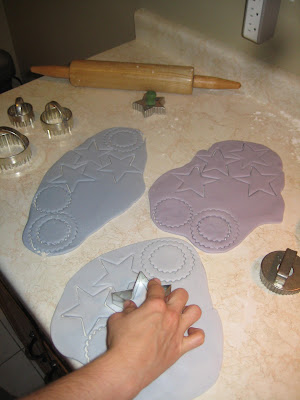
Decorating your cake is really up to you, but here's what I did. I divided the remaining fondant (leftover from the cake) into three equal parts then added the following food colouring combinations to each part:
a) 2 drops blue + 1 drop red
b) 4 drops blue + 2 drops red
c) 8 drops blue + 4 drops red
Knead the colour into the fondant, then roll out.
I used cookie cutters to make the star shapes and free-handed the swirls on the cake. My shapes seemed to stick well on their own to the cake, but to ensure they're stuck on well, lightly brush the back of the shapes with water and stick to cake.
Ta da!!! Isn't it fabulous!?
*Recipe credit goes to:
http://www.foodnetwork.com/recipes/paula-deen/red-velvet-cupcakes-with-cream-cheese-frosting-recipe/index.html
http://www.joyofbaking.com/RedVelvetCake.html
http://www.wilton.com/recipe/Rolled-Marshmallow-Fondant


I'm SO impressed, Jen! And also jealous that I wasn't your helper... lol...
ReplyDeleteThanks Mar. Don't worry, there will be plenty of cakes to come and I would love to create one together! Soon :)
ReplyDelete